Versailles Club Scrap Kit (August 2011) - Pages 15 and 16

Here are pages 15 and 16 of the August 2011 Versailles Club Scrap kit. I used  several
stamps that I received with the kit. Let's look below for more details about this layout.

Here is the first page of this two page layout.  I have one photo
mat on this page and it is cut at 3 3/4" x 5 1/4".

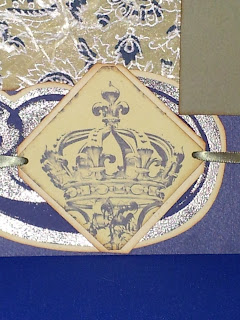
This stamp used is from the kit. I duplicated a punch out that is on the
 second page. I cut it larger in size. It is cut at 4 1/4" x 4 1/4". I cut a square and
just clipped off the corners.I stamped using Imprintz blue ink. I ran green ribbon through the
holes I punched using my Crop-a-Dile and tied a knot at the ends.

I stamped on the blue cardstock using embossing ink and then used silver embossing powder
 and a heat gun to emboss this stamp. The blue cardstock is cut at 4 1/4" x 5 1/2".
It is mounted onto green cardstock and that is cut at 4 1/2" x 5 3/4". I stamped onto green cardstock
using Imprintz blue ink. The green cardstock is cut at 2 1/4" x 4 1/4".
I cut this the same as the other one I did that I stamped onto, but this one I drew
journaling lines on top using a black Sakura gelly roll pen. I bought these from Joanns.
 I used my Fiskars Fastener to staple a ribbon to the top. It is cut at 4" x 4".

Here is the second page of the two page layout. I have a strip of
handmade paper going across the page. It is cut at 8 1/2" x 2 1/2".
 My photo mat on this page is cut at 3 3/4" x 5 1/4".
I cut these squares to 2" x 2" and then used the love and hope stamps that came
 with the kit and stamped in the center of the squares and then I ran a green ribbon down
the center of the squares and attached the top to the back of the layout and the bottom of the
ribbon is attached under the handmade paper going across the page.

This is a close up view at the stamping I did above the photo mat. I stamped before
 adhering my photo mat.  I used the same crown stamp as I used on
the first page and I stamped directly onto the blue cardstock. I used Studio G silver ink.

This embellishment came with the kit. It is a punch out.  I cut a square at 3 1/2" x 3 1/2"
 and cut off the tips and then layered the crown embellishment on top.

There was a mask that came with the kit. I forgot to use it. I meant to use it with some of my
 Triple M mists, but I forgot, so I took the mask and layed it down on top of blue
cardstock and then I used a embossing pad and rubbed it over the top and then took the silver
embossing powder and my heat gun and embossed it. I  only did half of the mask because it was pretty big. 


Click below to view my YouTube video:


Comments

Popular posts from this blog

a Boy and his Dog Scrapbook Layout

2nd Grade Literacy Night Scrapbook Layout (September 2021 Hip Kit) Page 7

Aurora Borealis Club Scrap Kit (December 2011) - Pages 11 and 12